ITNSA Pembahasan VPN Strongswan

 Disini akan mengkombinasikan Layer 2 tunneling protocol L2TP yang akan diproteksi dengan IPSec dengan software strongswan.

Selain itu strongswan juga bisa berdiri sendiri tanpa xl2tpd jika anda menginginkan VPN tipe lain IPSec yang di layer 3, FYI seperti gambar dibawah lokasi berdasarkan OSI layer, kalau misalnya OpenVPN berarti menggunakan SSL.
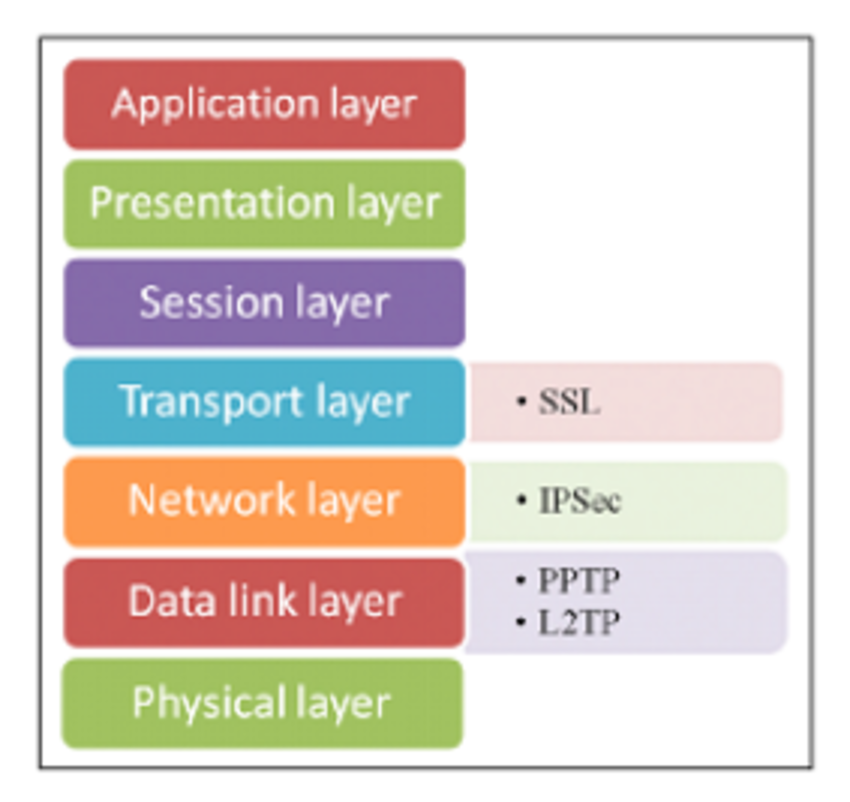
https://www.researchgate.net/publication/287458379_Efficiency_Consideration_for_Data_Packets_Encryption_within_Wireless_VPN_Tunneling_for_Video_Streaming


xl2tpd is an open source implementation of the L2TP tunneling protocol (RFC2661). xl2tpd is forked from l2tpd and is maintained by Xelerance Corporation.


Teori


The main purpose of this protocol is to tunnel PPP frames through IP networks. It implements both LAC and LNS role in the L2TP networking architecture.


StrongSwan is a comprehensive implementation of the Internet Key Exchange (IKE) protocols that allows securing IP traffic in policy- and route-based IPsec scenarios from simple to very complex.


xl2tpd is a fork of l2tpd Layer 2 Tunneling Protocol (L2TP) daemon that can be used to transfer frames of OSI layer 2 protocols through an IP tunnel. While it provides authentication via CHAP or PAP it does not provide encryption itself and should therefore be externally secured (via IPSEC).

https://packages.gentoo.org/packages/net-dialup/xl2tpd


How it works  https://www.techtarget.com/searchnetworking/definition/Layer-Two-Tunneling-Protocol-L2TP


Konfigurasi

apt install strongswan xl2tpd

/etc/ipsec.conf

conn L2TP-VPN
    left=210.100.2.1      ;  Public IP Address in Server Side
    leftprotoport=17/1701
    right=%any
    rightprotoport=17/%any
    authby=secret
    type=transport
    auto=add

/etc/ipsec.secrets

: PSK Pa$$worD

/etc/xl2tpd/xl2tpd.conf

[global]                                                               
access control = no  

[lns default]  
ip range = 192.168.1.100-192.168.1.199      ; for Client 
local ip = 192.168.1.1        
require authentication = yes  
name = l2tpd 
ppp debug = yes   
pppoptfile = /etc/ppp/ppp-options.xl2tpd 

cp /usr/share/doc/xl2tpd/examples/ppp-options.xl2tpd /etc/ppp

/etc/ppp/ppp-options.xl2tpd
ms-dns  192.168.1.250       ; Internal DNS Server for VPN Client
require-mschap-v2
#crtscts
#lock

/etc/ppp/chap-secrets

# Secrets for authentication using CHAP
# client        server  secret                  IP addresses
user01          *       password        *
user02          *       password        *

Setelah melakukan konfigurasi diatas selanjutnya bisa konek di sisi linux client dengan network manager GUI, atau dari windows bisa memakai bawaan network manager tanpa menginstall software client tambahan seperti openvpn.

Thanks.

Comments

Popular posts from this blog

ITNSA Konfigurasi Ansible WinRM Windows Server

 ### Mengonfigurasi Koneksi Ansible ke Server Windows Ansible adalah alat otomatisasi yang sangat populer dan sering digunakan untuk mengelola berbagai jenis server, termasuk server Windows. Artikel ini akan memandu Anda melalui langkah-langkah untuk mengonfigurasi Ansible agar dapat terhubung dengan server Windows menggunakan WinRM (Windows Remote Management). #### 1. Menyiapkan WinRM di Server Windows ##### Opsi 1: Menggunakan Skrip PowerShell Anda bisa menggunakan skrip PowerShell yang sudah disediakan untuk mengonfigurasi WinRM agar dapat digunakan oleh Ansible. 1. Buka PowerShell di server Windows Anda sebagai administrator. 2. Jalankan perintah berikut untuk mengunduh dan mengeksekusi skrip konfigurasi:    ```powershell    iex (New-Object Net.WebClient).DownloadString('https://github.com/ansible/ansible/raw/devel/examples/scripts/ConfigureRemotingForAnsible.ps1')    ``` ##### Opsi 2: Pengaturan Manual 1. Buka PowerShell di server Windows Anda seb...

Soal dan pembahasan LKS ITNSA Network Infrastructure Basic

Soal tahun 2021 tingkat Nasional Soal bisa di download di https://itnsa.id Basic Configuration Configure IP Address of all network devices according to the addressing table.  Create SSH user ‘patah’ with password specified in the appendix.  Make sure the user are able to enter configuration commands in the router.  Allow server admins to SSH to all network devices.  If you need to set additional password on the Routers, use Skills39 Look at the appendix table and configure accordingly Configure IP address: csr1000v# configure terminal #change interface name according to the topology csr1000v (config)# interface GigabitEthernet0 csr1000v (config-if)# ip address  x.x.x.x y.y.y.y csr1000v (config-if)# no shutdown Create SSH user: csr1000v# configure terminal csr1000v (config) # username patah password cisco123 csr1000v (config)# privilege 15 patah Allow server admins to SSH: csr1000v# configure terminal csr1000v (config)# ip access-list standard SSH_ACL csr10...

Analisa Traffic WAF

 Tentu, berikut adalah contoh untuk setiap bagian analisis traffic WAF: #### 1. Analisis Path **Contoh**: - **Path yang Tidak Biasa**: Misalkan aplikasi Anda memiliki endpoint `/login`. Jika Anda melihat permintaan ke path seperti `/admin/../../config`, ini adalah path yang mencurigakan karena tampaknya mencoba mengakses direktori konfigurasi dengan teknik path traversal. - **Pengelompokan Traffic**: Jika banyak permintaan ke path `/api/upload` yang mencurigakan, ini bisa menunjukkan upaya eksploitasi terhadap fungsi upload file. #### 2. Analisis Method **Contoh**: - **Method GET**: Anda melihat permintaan GET dengan query string yang panjang seperti `GET /search?q=...`, di mana query string sangat panjang dan mengandung karakter yang tidak biasa. Ini bisa menjadi indikasi serangan seperti buffer overflow. - **Method POST**: Anda menerima banyak permintaan POST dengan payload yang besar dan mencurigakan, seperti `POST /update-profile` dengan data yang tidak sesuai format atau panja...